Cupping: materials, methods, observation, and safety
A visual path through the history of cupping, its traditional methods, and the limits of responsible interpretation.
Traditional framework
Within the traditional framework, cupping is studied as an external method intended to move Qi and Blood and influence the surface and channels. This describes a historical TCM system, not a biomedical mechanism.
Origins and development
From horn and bamboo vessels to modern glass and valve systems.
Cupping grew from a simple idea: creating a vacuum on the skin to “draw out” what the traditional framework described as cold, dampness, or stasis. The oldest known Chinese record appears in the Mawangdui silk manuscripts (buried around 168 BCE), where the “Recipes for Fifty-Two Ailments” describe treatment with a horn. Centuries later Ge Hong records the technique in his fourth-century emergency handbook, and from there every available material — bamboo, ceramic, glass, plastic — kept redefining what could be done with it.
The name we use today, 火罐 “fire jar,” becomes common in Qing-dynasty texts such as Zhao Xuemin’s 1765 supplement to the great materia medica. Its spread beyond Asia is far more recent: the method reached Western audiences in the twentieth century and became massively visible after appearing on Olympic athletes. That leap explains a tension worth holding from the start: a long, well-documented history is not the same as solid clinical evidence, and the two are studied separately.
- Suction methods appear independently in several medical traditions — Chinese, Greek, Arabic — which tells us the idea of the vacuum is intuitive; what was specific to China was integrating it into the framework of channels, cold, dampness, and stasis.
- Each change of material solved a concrete problem: bamboo made the instrument cheap, glass made the skin visible during application, and the valve removed fire from the procedure.
- Hygiene was the great historical weakness: the porous, reused materials tradition relied on cannot meet current reprocessing standards.
- Responsible practice today separates three planes that are often blurred: historical and cultural context, regulated professional training, and what research actually supports.
角法 · Jiǎo Fǎ “Horn method”: the oldest documented name of the technique, from the era when the instrument was a trimmed animal horn and suction was created by mouth.
Materials and equipment
What each cup contributes and why they are not interchangeable.
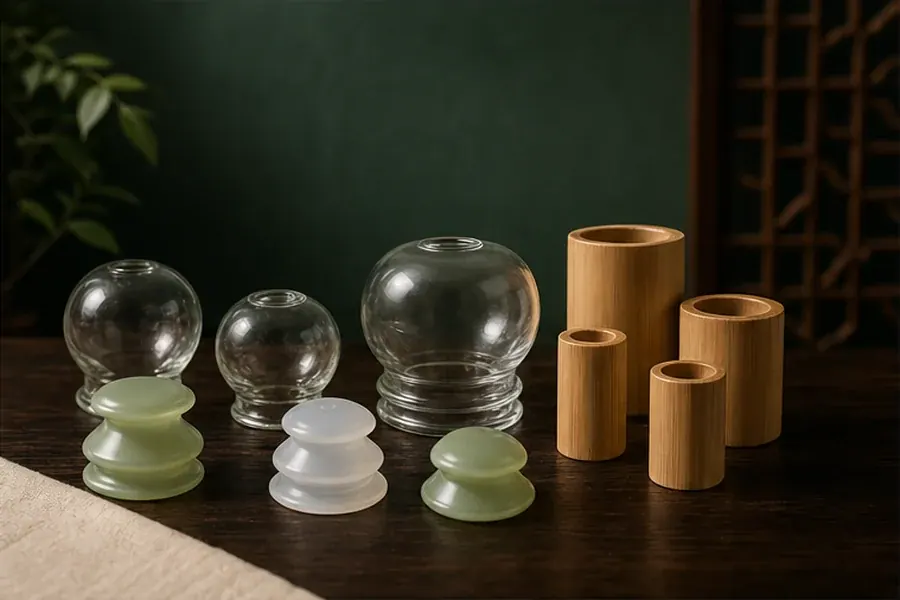
Each material solves a different problem: glass lets you watch the skin during application, valve cups remove the flame, silicone allows gliding. Choosing a cup is not an aesthetic question but a technical decision combining three things: the body area, the intended method, and whether that material can genuinely be reprocessed between people.
It helps to understand the physics before the ritual. In fire cupping the flame goes in and out in an instant: it consumes the oxygen inside and, as the air cools, it contracts and creates a pressure lower than atmospheric. That is what holds the cup. Valve cups achieve the same effect by pumping air out, with the advantage that the vacuum is adjustable and repeatable; silicone does it by compressing the flexible body before placement. In none of the three cases is the stimulus thermal — it is mechanical.
- Glass is the only material that lets you watch skin color throughout the application, which makes it the reference for learning; in exchange, fire-generated vacuum demands careful handling of the rim and the alcohol.
- Bamboo is light, cheap, and traditional, but opaque — you cannot see the skin — and porous, which makes it problematic for shared use; any crack rules it out.
- Valve cups let you set and repeat a specific suction level without fire, which makes them the best material for learning to dose.
- Silicone is flexible and designed for moving methods; its suction depends on how much it is compressed, so it changes on its own if the cup deforms mid-stroke.
- Every cup is checked before use: intact, smooth rim, no fissures or chips, and a reprocessing procedure the material can actually withstand.
Therapeutic vacuum The pressure difference that fixes the cup to the skin and lifts the tissue slightly into it. It can be created by heat (air contracting as it cools) or mechanically (valve or compression).
Preparation and communication
What happens before the first cup shapes the whole session.
A well-prepared session starts long before the first cup: a suitable setting, skin inspection, a review of relevant history, and a clear agreement about what the person will feel and how to stop. This framing is not paperwork — it is what turns the technique into a controlled process, comparable across sessions and defensible if something goes wrong.
Cupping has one feature that forces a specific conversation: it leaves visible marks for days. Saying so in advance is not politeness, it is part of informed consent, and omitting it is one of the most frequent complaints. Someone who works face-to-face with the public, competes in a sport with image or doping controls, or simply has a wedding at the weekend needs to know before deciding. The same conversation sets the stop signal and the expectations about which sensations are normal.
- The setting matters more than it seems: enough light to judge true skin color, stable temperature — the person will be partly undressed — and a firm support surface.
- Inspecting the skin first is mandatory: wounds, eczema, infection, recent sunburn, prominent moles, or very thin skin rule out that area, not the whole session.
- Relevant history is asked beforehand: anticoagulants and antiplatelets, clotting disorders, pregnancy, diabetes with neuropathy, long-term corticosteroids, and any altered sensation.
- A stop signal is agreed explicitly, and the difference is explained between what is expected (pressure, tightness, diffuse warmth) and what is not (sharp pain, burning, tingling).
- The plan written before starting — areas, method, intended parameters — is what later lets you compare responses and reconstruct an incident.
Informed consent Prior agreement based on real information: what the technique involves, what it will feel like, what marks it will leave, how long they last, and what alternatives exist.
Dry stationary cupping
A cup remains in one place for a limited period under continuous observation.
This is the reference method for study: the cup adheres and stays still while the tissue lifts slightly into it. Understanding the relationship between vacuum, diameter, and time teaches the central competence of the whole discipline — grading the stimulus instead of maximizing it — and that competence then transfers to every other method.
The dose is not a single number but the interaction of three variables. Vacuum determines how much negative pressure the tissue receives; diameter decides the surface it spreads across, so a small cup at the same vacuum concentrates far more; and time accumulates the effect of both. As a study reference, applications are short — on the order of five to ten minutes, and three to five on a first exposure or on sensitive skin — always subordinate to what the skin shows. Removal has its own technique: press the skin beside the rim to break the seal and let air in; never pull the cup.
- Real intensity is the product of vacuum, diameter, and time: changing one forces you to reconsider the other two.
- The reference sensation is a firm but tolerable pull that still allows normal conversation; if the person holds their breath or braces, the stimulus is already excessive.
- A stronger sensation does not mean a better intervention, and the opposite belief is the main cause of blisters from excessive vacuum.
- Skin is checked during the application, not only at the end: sharp pain, burning, numbness, or marked pallor inside the cup mean removing it.
- Clear-fluid blisters inside the cup indicate excessive vacuum or time: they are not a sign that “dampness is coming out” — they are an injury.
- Removal is done by releasing the seal with a finger beside the rim; pulling the cup tears the adhesion and can injure fragile skin.
留罐 · Liú Guàn “Retained cup”: the traditional name of the stationary method, in which the cup stays on one spot for a limited time under continuous observation.
Moving and flash cupping
Two distinct approaches that differ from stationary cupping.
Moving cupping turns the cup into a mobile tool over lubricated skin; flash cupping places and removes the cup repeatedly over the same region. These are not minor variants of the stationary method: they change the type of stimulus, the surface that takes the load, and the areas where they make sense, which is why they are studied as separate techniques with their own criteria.
Each follows a different logic. Zǒu Guàn spreads a moderate stimulus along a long path, covering a whole region rather than a point: it needs low to medium vacuum and generous lubrication, because with strong suction the cup stops gliding and starts dragging the skin. Shǎn Guàn does the opposite: it applies and removes within a second, many times over, producing a repeated superficial stimulus described as dispersing within the traditional framework. In moving cupping you follow the direction of the muscle masses, with overlapping passes, without working one line until it reddens excessively.
- In Zǒu Guàn the vacuum should be the minimum that keeps the cup attached while it moves: if you have to force it along, there is too much suction.
- The lubricant is part of the method, not an extra: enough for the whole path, skin-compatible — watch for vegetable-oil allergies — and removed at the end.
- In Shǎn Guàn rhythm matters more than power: very brief repeated placements, checking skin color every few repetitions.
- Moving cupping needs broad, regular surfaces; flash cupping tolerates somewhat smaller areas because contact is momentary.
- The choice between methods follows the area, the study aim, and the person’s tolerance — never the color you want to produce.
走罐 · Zǒu Guàn / 閃罐 Shǎn Guàn “Walking cup” (moving) and “lightning cup” (flash): the traditional names of the two dynamic methods.
Application areas and positioning
Where the method is studied and how the person is positioned.
Anatomy rules: the method is studied over regular muscular surfaces where the rim seats fully and no vulnerable structures lie immediately beneath. Positioning is part of the technique — a stable posture prevents unexpected movement, keeps the skin observable throughout, and means the person never has to shift mid-application.
The classic study areas are the paraspinal muscles, the trapezius, the gluteal region, and the back of the thighs: broad surfaces with a muscular cushion and gentle curvature. Every avoided area has a concrete anatomical reason: the front of the neck because of the carotid artery and vascular bundle; the popliteal fossa, groin, and axilla because of their superficial vessels and nerves; bony prominences — spinous processes, scapula, iliac crest — because the rim cannot seal; and the abdomen during pregnancy, along with the lumbosacral region in that context, on precautionary grounds. Cups are not placed directly on the spine: you work either side of it.
- The paraspinal musculature is the learning area par excellence: regular surface, good muscular cushion, and easy to observe with the person prone.
- Diameter is matched to anatomy: large cups spread pressure over flat areas, small cups fit contours but concentrate the stimulus far more at the same vacuum.
- Stable positions — prone with support, sitting with the arms resting — keep the person from having to move and the cup from shifting or releasing.
- Superficial vascular and nervous structures (front of the neck, popliteal fossa, groin, axilla), bony prominences, and any area with little muscle mass are avoided.
- In pregnancy the abdomen and lumbosacral region are excluded; in general, any anatomical doubt means the area is not used.
Cup seating Full, even contact of the rim with the skin. Without seating there is no stable vacuum, the cup releases, and whatever pressure does reach the tissue concentrates unpredictably.
Marks: observe without diagnosing
Explain color changes without turning them into a diagnostic test.
The mark is cupping’s most visible effect and its most misunderstood one. Physically it is blood extravasation in superficial capillaries caused by negative pressure: the most fragile vessels give way, blood stays in the tissue, and it breaks down and is reabsorbed over days. It is shaped by vacuum, time, area, and each person’s capillary fragility — and by nothing else.
Scales circulate that assign meaning to each shade — light, red, purple, near black — turning them into a diagnosis of “cold,” “stasis,” or “toxins.” None of those scales is validated, and there is a simple reason to distrust them: the same person marks differently on the trapezius than on the glute, and someone on anticoagulants marks intensely from a minimal stimulus. The mark tells you about that person’s skin and vessels in that area, not about their organs or the quality of the session. What is genuine technical competence is distinguishing expected bruising from what is not: ring-shaped irritation from a defective rim, blisters from excessive vacuum, burns, or any lesion that does not follow the usual course.
- The mark depends on vacuum, time, body area, capillary fragility, age, and medication: six variables no color scale can separate.
- Color alone identifies neither “toxins,” nor affected organs, nor severity; reading it that way is the technique’s most widespread conceptual error.
- The expected course is to fade over roughly 3 to 10 days, passing through the usual bruise shades, without increasing pain.
- A reddened, painful ring at the rim is not a mark: it usually indicates a chipped rim or a defective seat.
- Blisters, open wounds, pain that grows over days, or signs of infection fall outside the expected range and require medical assessment.
Ecchymosis Blood extravasation into superficial tissue. After cupping its expected course is to fade over 3–10 days while changing color, without increasing pain.
Wet cupping: professional content
It involves puncturing or incising skin and exposure to blood.
Wet cupping combines a superficial puncture or incision with suction, so there is direct exposure to blood. That single fact changes its category: it stops being an external method on intact skin and becomes an invasive procedure, with everything that implies for infection control, waste, and legal responsibility. This library covers its historical place and its risks; it does not explain how to perform it.
Known as Cì Luò Bá Guàn in the Chinese tradition and as hijama in the Arab-Islamic world, where it has its own cultural and religious roots, this method requires single-use sterile equipment, a rigid sharps container, a disinfected surface, gloves, and a protocol for accidental exposure. The documented risks are not theoretical: local and systemic infection, transmission of bloodborne pathogens when equipment is reused, and iron-deficiency anemia in people who repeat it very frequently. In many countries only licensed health professionals may perform it.
- The essential difference from dry cupping is not intensity but nature: the skin barrier is broken and there is contact with blood.
- It requires single-use sterile equipment, regulated sharps disposal, gloves, and a written protocol for needlestick or splash exposure.
- Documented risks include local infection, transmission of bloodborne pathogens through reused equipment, and anemia from excessive repetition.
- It is formally contraindicated in anticoagulation, clotting disorders, immunosuppression, anemia, and pregnancy.
- The legal framework varies by country and determines who may perform it: checking it is part of training, not an administrative formality.
刺絡拔罐 · Cì Luò Bá Guàn “Collateral-pricking cupping”: the traditional name of the wet method, pairing superficial bloodletting with suction.
Contraindications and precautions
Choosing not to apply a method is part of professional competence.
Knowing when not to apply is the most important safety content in this module. Absolute contraindications rule the technique out; relative ones require adapting it, justifying it, and watching closely. The list is not memorized as dogma: understood through its mechanism, it stops being a list and becomes a criterion you can apply to situations nobody taught you.
There are essentially four risk mechanisms. First, skin integrity: if skin is broken, infected, burned, or ulcerated, suction worsens the lesion and can spread infection. Second, hemostasis: with anticoagulants, antiplatelets, thrombocytopenia, or liver disease, the same negative pressure produces far larger bruising. Third, perception: if the person cannot feel the area properly — diabetic neuropathy, spinal cord injury, sedation — you lose the technique’s main alarm system. And fourth, anatomy: vascular, nervous, or visceral structures that do not tolerate traction. Almost any contraindication you encounter fits one of these four boxes.
- Absolute, by skin integrity: broken skin, active infection, flaring eczema, burns, ulcers, skin tumors, or an area with suspected venous thrombosis.
- Absolute, by general safety: severe clotting disorders, significant anemia, clinical instability, or fever of unknown origin.
- Relative, by hemostasis: anticoagulation, antiplatelet therapy, thrombocytopenia, or liver disease call for reduced vacuum and time — and often abstention.
- Relative, by perception: neuropathy, neurological injury, or any altered sensation removes the alarm system that makes the application safe.
- By age and condition: in pediatric and older ages skin is more fragile and parameters are systematically reduced; in pregnancy the abdomen and lumbosacral region are excluded.
- By anatomy: never over eyes, mucosa, vulnerable bony prominences, superficial large vessels, or any region whose anatomy you do not know well.
Absolute vs. relative contraindication An absolute contraindication rules the technique out entirely; a relative one requires adapting it, justifying why it is applied, and watching closely.
Hygiene, follow-up, and warning signs
What to document and when to recommend medical care.
Closing the session is also technique: check the skin, explain the expected course of the marks, record what was applied, and make clear which signs require medical assessment. The record turns practice into something that can be evaluated — it lets you know whether something worked and reconstruct what happened if it did not — and protects both the receiver and the practitioner.
Hygiene depends on the material, and it is worth being honest about its limits: glass and silicone allow effective cleaning and disinfection; valve cups demand attention to the valve itself, where residue accumulates; bamboo, porous and full of moisture-retaining fibers, cannot be reliably reprocessed and should not be shared between people. In the moving method the lubricant must be removed afterwards, since it ends up mixed with shed skin cells. The aftercare advice is simple: protect the area from intense cold, direct sun, and friction for the rest of the day.
- Reprocessing is chosen by material, not by habit: if a material cannot be reliably disinfected, it is not shared between people.
- Record area, method, parameters (vacuum, diameter, time), immediate response, and any incident, however minor it seems.
- Explain the expected course to the person — a mark that fades over days without increasing pain — so they can tell normal from abnormal.
- After the session, protect the area from intense cold, direct sun, sauna, and friction for the following hours.
- Requiring medical assessment: pain that increases over days, discharge, fever, loss of sensation, extensive blistering, or any burn.
Traceability Systematic recording of area, method, parameters, and response that allows comparing sessions, adjusting the dose, and investigating incidents.
What the evidence says
Systematic reviews find mostly small studies at high risk of bias, largely because a credible placebo is nearly impossible to design: the mark gives the group away. There are signals of possible short-term relief in musculoskeletal pain, but results are heterogeneous and do not support firm conclusions. Adverse effects, by contrast, are well documented: bruising, blisters, burns, and infections associated with the wet method.
Safety
Improper cupping can cause bruising, blisters, burns, or infection. Wet cupping breaks the skin and is presented only as professional study content.
Test what you've learned
Tap each question to see the correct answer and its explanation.
1. What can be concluded from the color of a cupping mark alone?
- The affected organ
- The exact toxin load
- Nothing diagnostic by itself
- The length of the next session
Appearance depends on many variables and does not independently validate a traditional pattern or biomedical diagnosis.
2. Which method is reserved for professional study content?
- Silicone cups
- Wet cupping
- Flash cupping
- Comparing materials
Wet cupping breaks the skin and requires infection control, sterile equipment, and regulated training.
3. Which sensation means an application should stop and be checked?
- Tolerable pressure
- Mild room warmth
- Sharp pain or burning
- Feeling the rim
Sharp pain, burning, numbness, or another unexpected reaction requires cup removal and skin assessment.
4. In classic fire cupping, what is the flame for?
- Heating the cup to transmit warmth
- Consuming the oxygen to create the vacuum
- Sterilizing the skin
- Marking the application area
The flame consumes the oxygen inside the cup an instant before placement: it creates the vacuum, not a thermal stimulus.
Health notice. Educational and study content. It describes concepts of Traditional Chinese Medicine and does not replace diagnosis or treatment by a healthcare professional. Needling, medicinal herbs and invasive techniques must be applied by trained professionals. Safety guide.